
Explanation of each setting possible in LPub3D Page Globals Setup. For each function with image examples the effects are shown in the document as well.
LPub3D version: v2.3.13 r113
In this chapter each Tab will be explained:
- Page
- Model
- Title/Cover Image
- Description
- Model ID/parts
- Colors
- Publish
- Aurhor/Email
- URL/Description
- Copyright/Logo
- Disclaimer
- Disclaimer
- LPub3D Plugin
- Page Number
Page – Tab
In ‘Size and Orientation’ you can select all types of ISO-standard paper sizes and other sizes. At the bottom of the pull-down you can select ‘Custom’, this enables the 2 entry fields at the right (see 1 and 2).
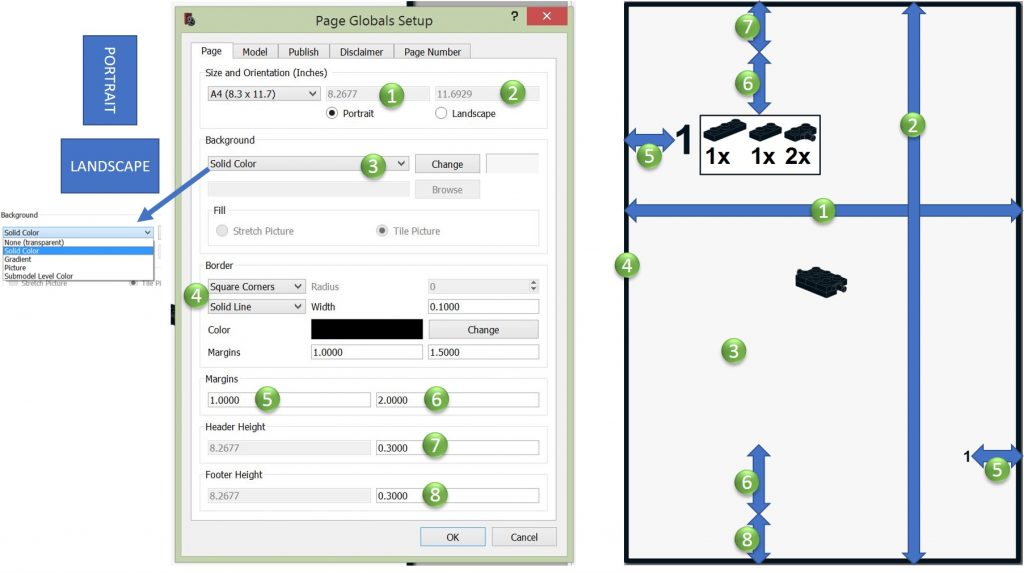
The background can be set for the document, not page specific. For background there are different options:
– None (transparent)
– Solid Color; via the change-button you can select/create a color for the page background
– Gradient; Via the Change-button you can create a gradient background
– Picture; when selected the browse-button for picture search enables and the Fill options are enabled; ‘stretch‘ the picture is stretched over the page, ‘tile‘; the page will be filled with the actual size picture starting left upper corner.
– Submodel Level Color; default setting, each submodel level color can be set elsewhere.
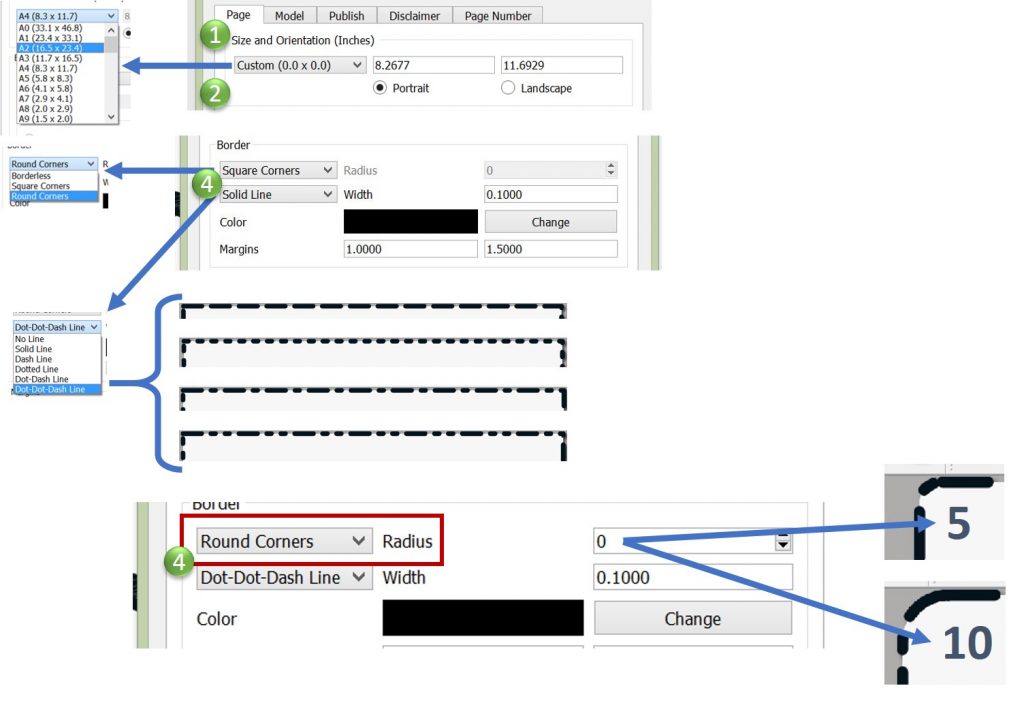
A border can be created in 5 different styles (solid and 4 types of dotted lines) and all possible colors.
For the corners 2 options;
– Square Corners
– Round Corners; this enables the ‘Radius’ field, the higher the value the bigger the radius.
Tab – Model
Tab Model consists of 4 sub tabs:
- Title/Cover Image
- Description
- Model ID/parts
- Colors
Subtab – Title/Cover Image
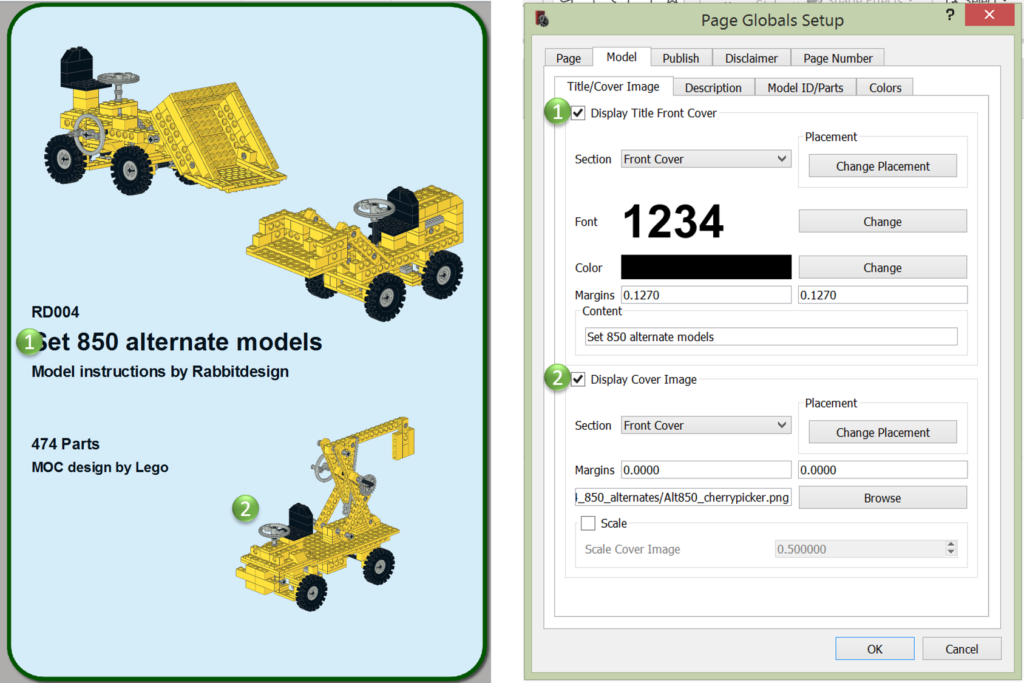
First tick-box is for enabling the display of the ‘Title’. You can either show the ‘Title’ on the ‘Front Cover’ or ‘Back Cover’ via the section selection.
For this text block you can change Font Type, Size and Color.
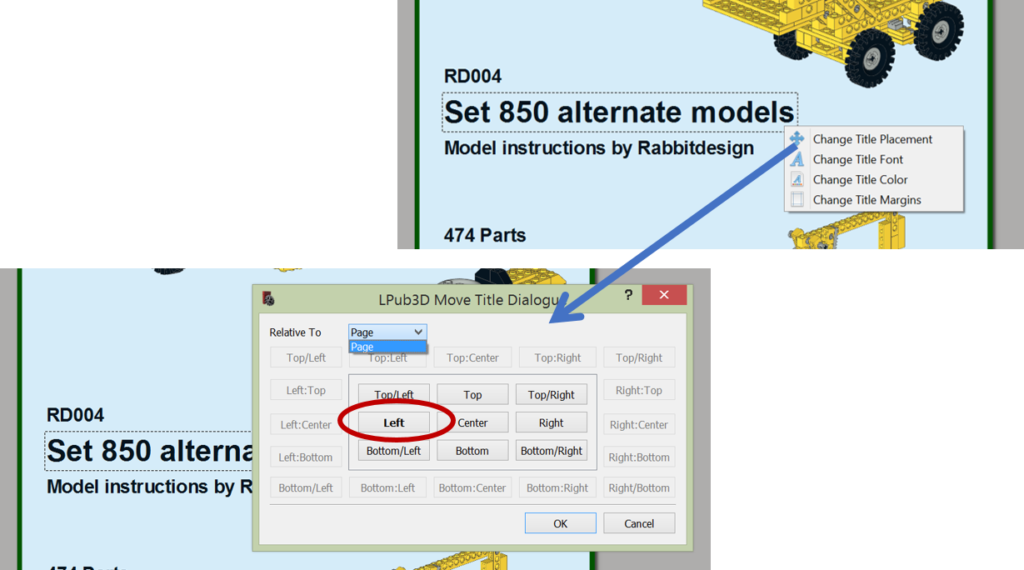
The title you can position freely with your mouse by dragging. You can position more specific via the menu. Positioning can only relative to the ‘Page’. Later we will see that other text blocks can be positioned relative to each other.
Second tick-box is for placing an image on the page via a file selection.
Image you can place relative to the page as well or freely with dragging by mouse.
Description – Sub-tab
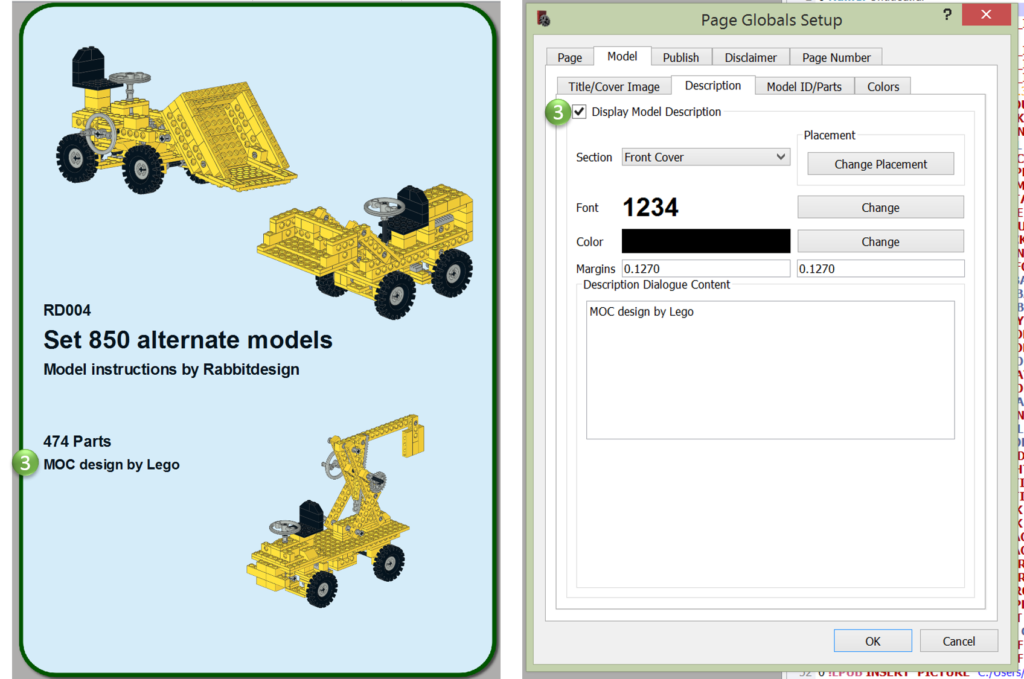
Next tab is for a Model Description which can be placed on Front or Back cover as well.
The description Font Type, Size and Color can be set.
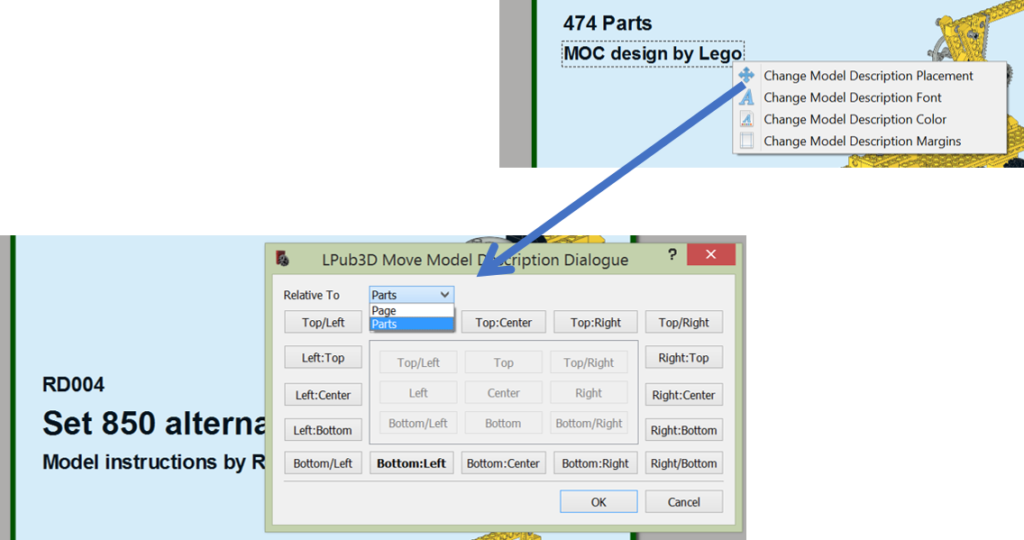
The Description can be placed freely by mouse dragging or by positioning menu options:
In this case options:
- Relative to page
- Relative to the ‘Parts’ text block. This one is determined in Tab ‘Model ID/Parts’
Model ID/Parts – Sub-tab
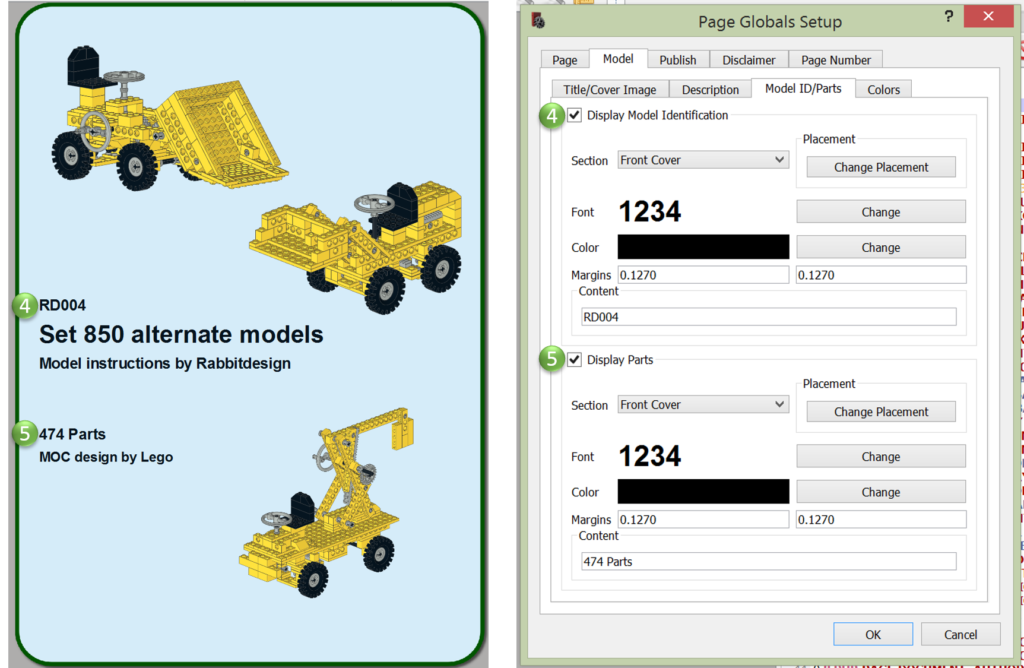
First tick-box is for enabling the ‘Model Identfcation’. This is a text-block to maintain your Model-ID. Like the 42xxx nmbers from Lego original sets or like mine starting with RDYxx.
This text-box you can determine the Font Type, Size and color.
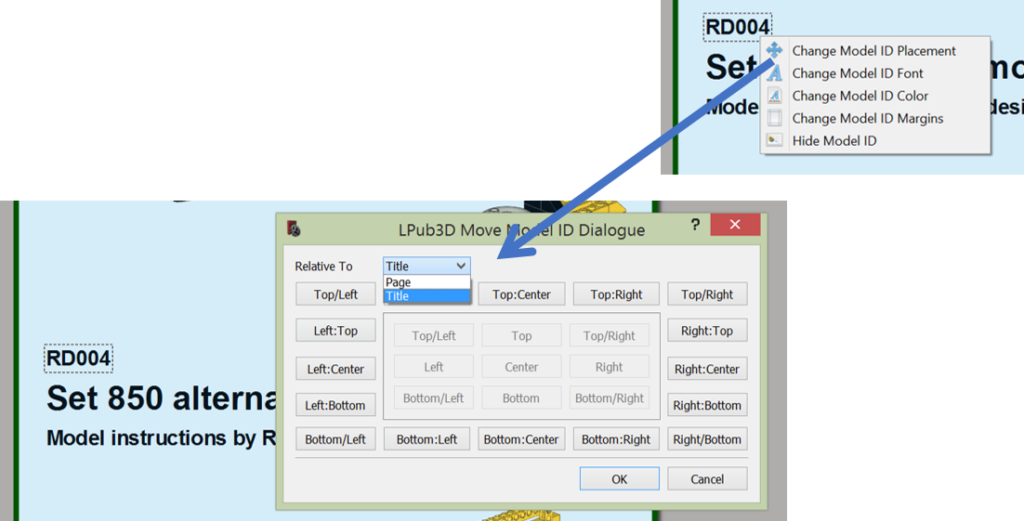
The Model ID can be placed freely by mouse dragging or by positioning menu options:
In this case options:
- Relative to page
- Relative to the ‘Title’ text block. This one is determined in Tab ‘Title/Cover Image’
Second tick-box is for the parts count text-box of your moc. In this case the parts count is taken from the MLcad file that is the input for LPub3D.
The amount is pre-filled, but you can change the text.
This text-box you can determine the Font Type, Size and color.
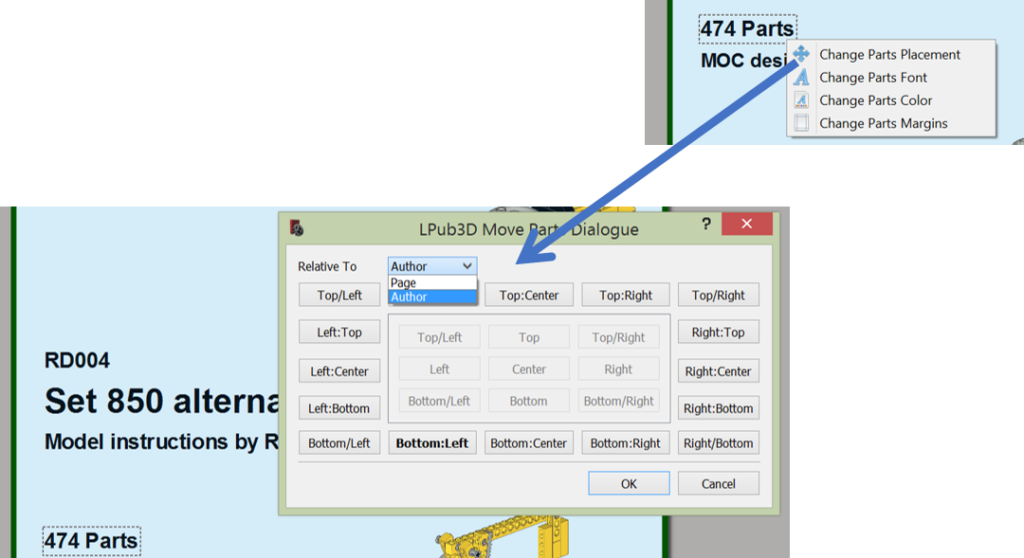
The Parts-count can be placed freely by mouse dragging or by positioning menu options:
In this case options:
- Relative to page
- Relative to the ‘Author’ text block. This one is determined in Tab ‘Publish’ and sub-tab ‘Author/Email’
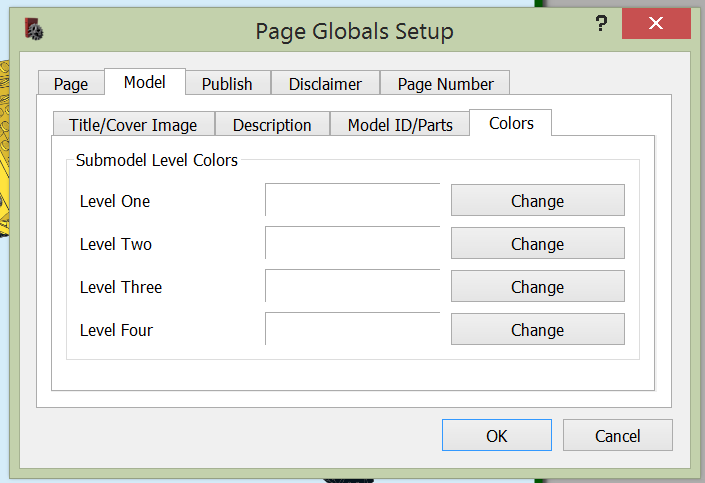
Colors – Sub-tab
This tab is available in more setting tabs. Here you can over rule the background color of the page with different colors per ‘Sub Model Level’. Max number of sub models is 4 levels. I don’t like this options so I make them all empty.
Publish -Tab
Tab Publish consists of 3 sub tabs:
- Aurhor/Email
- URL/Description
- Copyright/Logo
Author/Email – Sub-tab
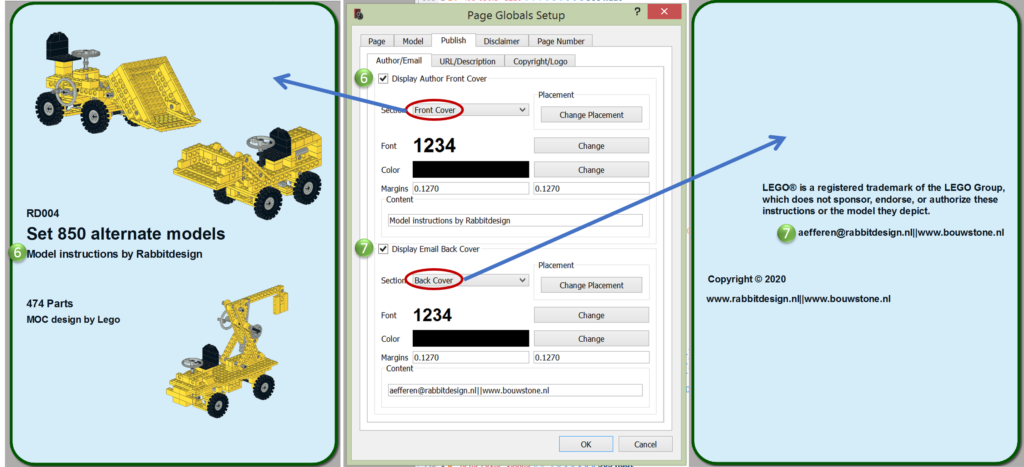
First tick-box for enabling the ‘Author’ of the model or MOC. This is a text-block to maintain your name as Author.
This text-box you can determine the Font Type, Size and color.
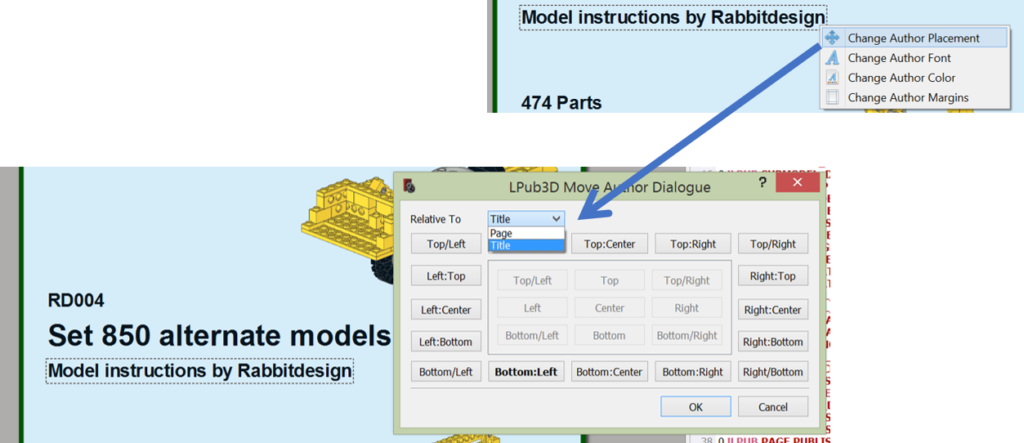
The ‘Author’ text-box can be placed freely by mouse dragging or by positioning menu options:
In this case options:
- Relative to page
- Relative to the ‘Title’ text block. This one is determined in Tab ‘Model’ and sub-tab ‘Title/Cover Image’
Second tick-box is to enable your ‘Email Address’ on the back cover of your booklet. You can choose for: Back Cover or specific Footer or Header of your Back Cover.
This text-box you can determine the Font Type, Size and color.
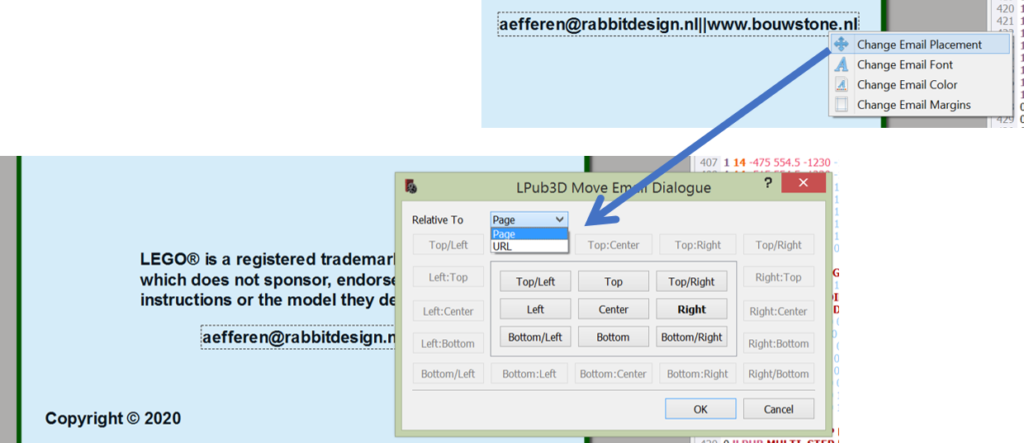
The ‘Email’ text-box can be placed freely by mouse dragging or by positioning menu options:
In this case options:
- Relative to page
- Relative to the ‘URL’ text block. This one is determined in Tab ‘Publish’ and sub-tab ‘URL/Descriptions’
URL/Description – Sub-tab
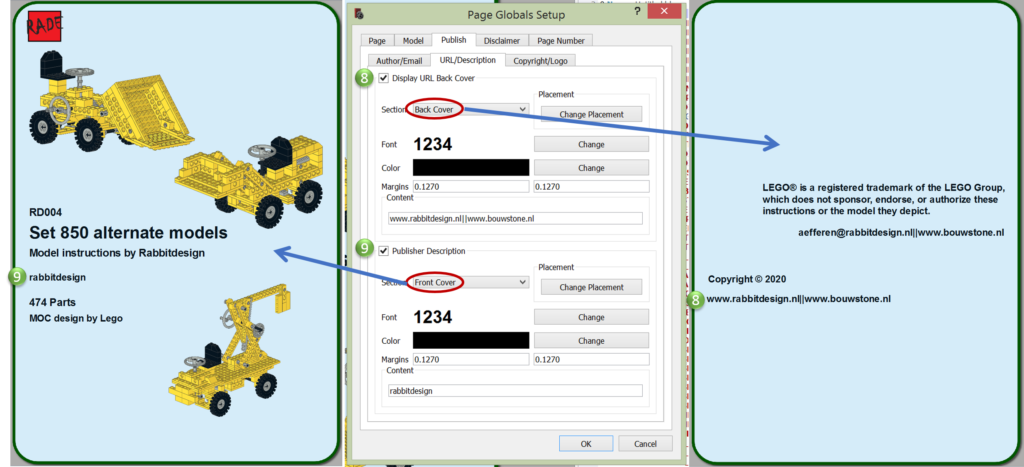
First tick-box to enable the URL text-box. This text-box can only be placed on the back cover of your booklet. You can choose for: Back Cover or specific Footer or Header of your Back Cover.
This text-box you can determine the Font Type, Size and color.
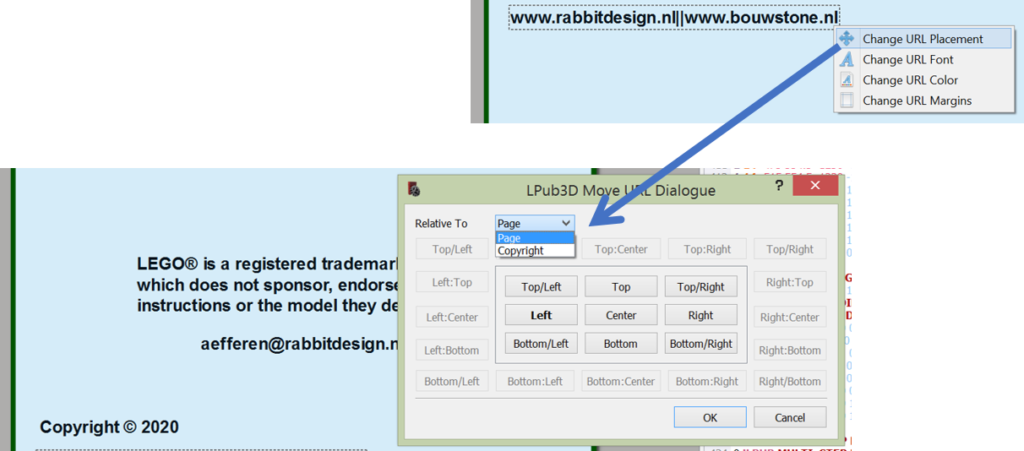
The ‘URL’ text-box can be placed freely by mouse dragging or by positioning menu options:
In this case options:
- Relative to page
- Relative to the ‘Copyright’ text block. This one is determined in Tab ‘Publish’ and sub-tab ‘Copyright/Logo’
Second tick-box is to enable your ‘Publisher Description’. This text-box can only be placed at the front cover of your booklet. Page only not possible to put this text-box in either Footer or Header of your Front Cover.
This text-box you can determine the Font Type, Size and color.
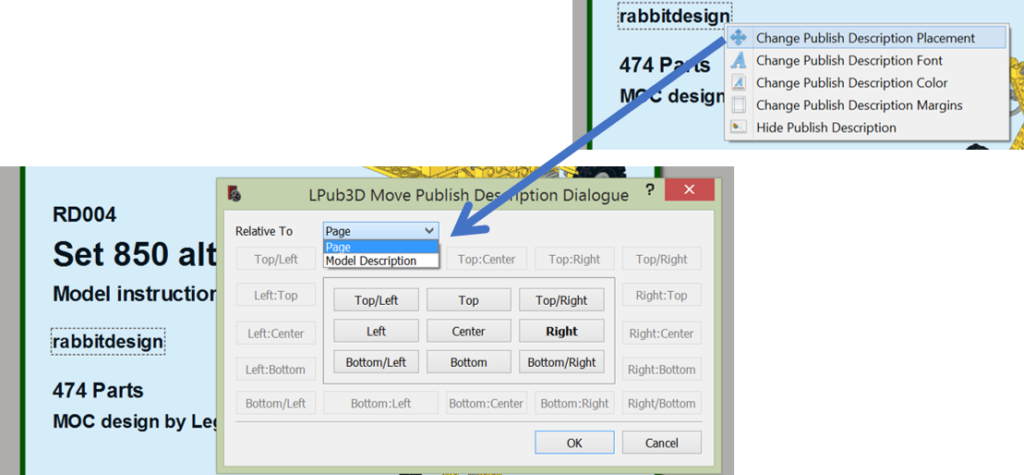
The ‘Publisher Description’ text-box can be placed freely by mouse dragging or by positioning menu options:
In this case options:
- Relative to page
- Relative to the ‘Model Description’ text block. This one is determined in Tab ‘Model’ and sub-tab ‘Description’
Copyright/Logo Sub-tab
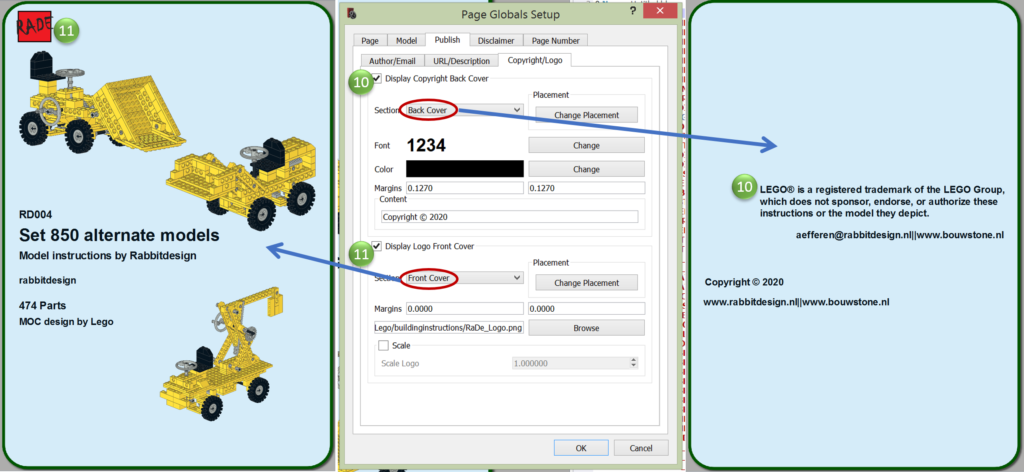
First tick-box to enable the ‘Copyright’ text-box. This text-box can only be placed on the back cover of your booklet. You can choose for: Back Cover or specific Footer or Header of your Back Cover.
This text-box you can determine the Font Type, Size and color.
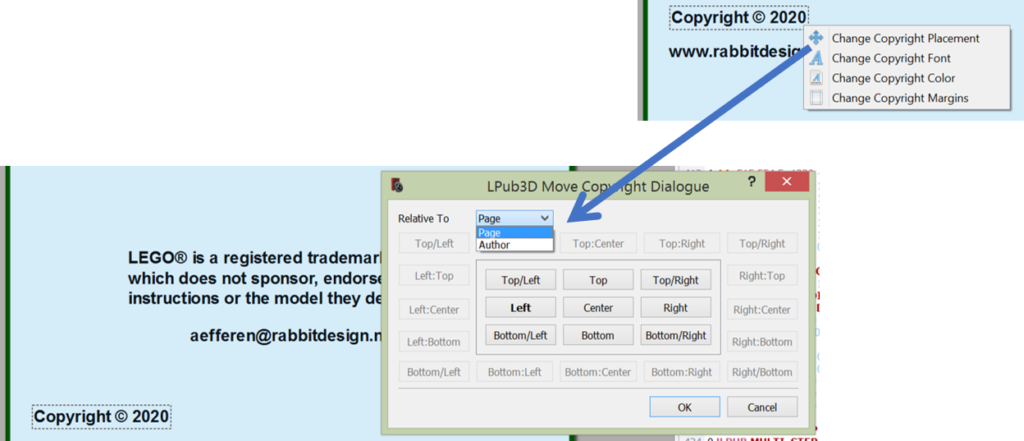
The ‘Copyright’ text-box can be placed freely by mouse dragging or by positioning menu options:
In this case options:
- Relative to page
- Relative to the ‘Author’ text block. This one is determined in Tab ‘Publish’ and sub-tab ‘Author/Email’
Second tick-box is to enable your ‘Logo’. With file selection you can determine an image to be placed on your cover page. When you have this standardized you can have this standardized. A logo can be placed at the front cover or back cover of your booklet. Via check-box ‘Scale’ you can manipulate the size of the image.
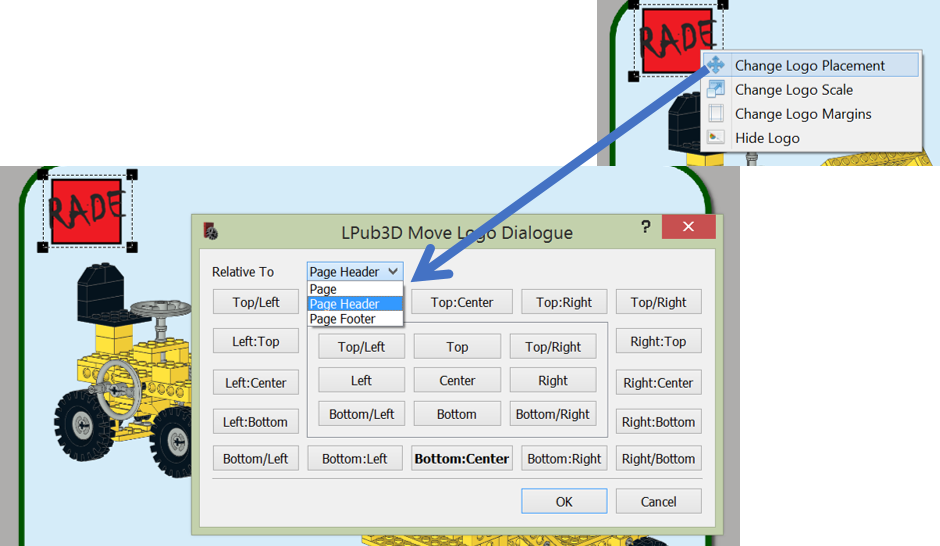
The ‘Logo’ image can be placed freely by mouse dragging or by positioning menu options:
In this case options:
- Relative to Page
- Relative to the ‘Page Header’ or ‘Page Footer’.
Disclaimer – Tab
The ‘Disclaimer’ tab consists of 2 sub-tabs:
- Disclaimer
- LPub3D Plugin
Disclaimer – Sub-tab
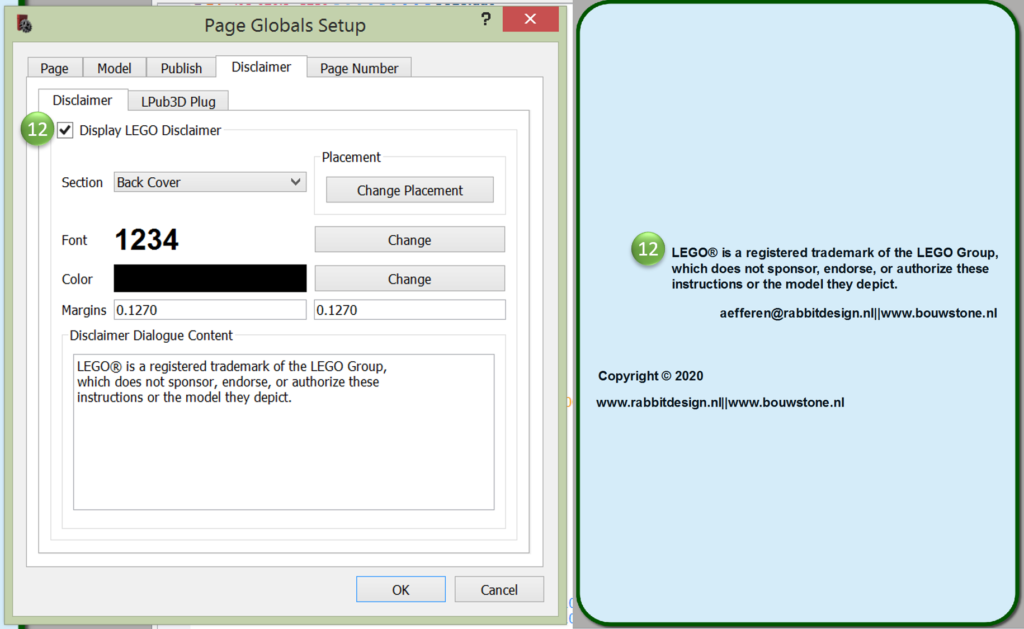
With this tick-box you can place the disclaimer on your building-instructions. This Disclaimer you can get from the Lego website. When you have this disclaimer on your material Lego will allow the usage of Lego Intellectual Property.
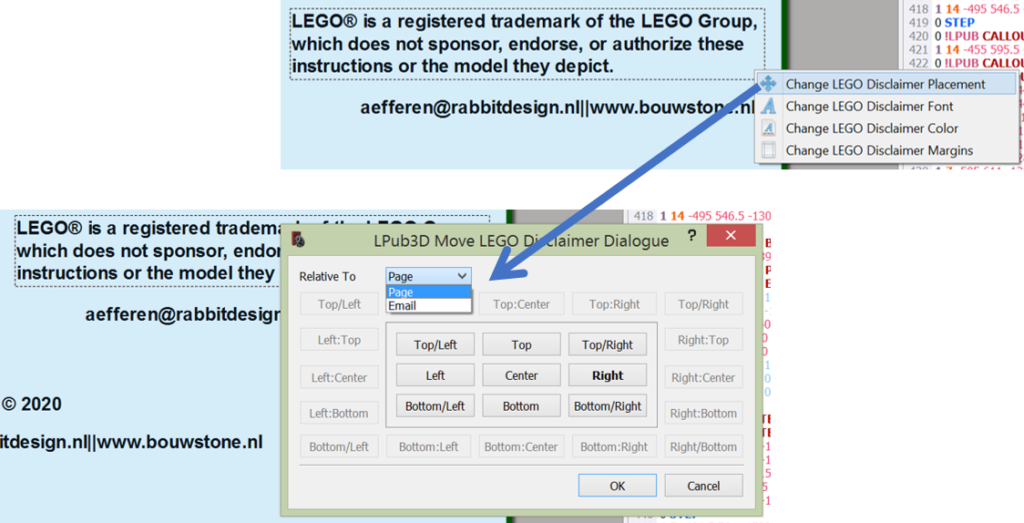
The ‘Disclaimer’ text-box can be placed freely by mouse dragging or by positioning menu options:
In this case options:
- Relative to Page
- Relative to the ‘Email’ text block. This one is determined in Tab ‘Publish’ and sub-tab ‘Author/Email’
LPub3D Plugin – sub-tab
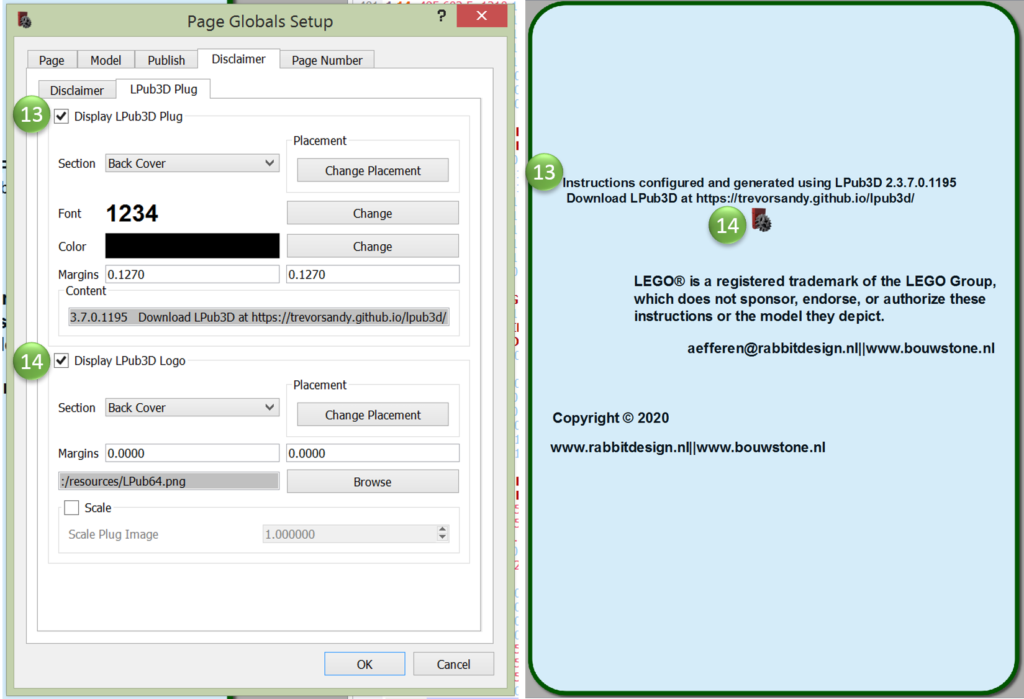
| URL | Page Page Number Page Header Page Footer | |
| Page Page Number URL Page Header Page Footer | ||
| Disclaimer | Page | |
| Copyright | Page Author | |
| Author | Page Cover Page Back Page header Page Footer | Page Title |